Tuesday, March 27, 2007

Roasted Grapefruit with Yogurt


Generally, I don't do fussy weekday breakfasts. In fact, solitary breakfast is almost always consists of toasting whatever carb is at hand and smearing it with the sugary contents of the first jar that comes to my attention in the refrigerator door. I find, though, that on the rare occasions when I get my act together and do something more elaborate for my first meal, it gives me the feeling that I'm really in control of my life. To be the kind of person who prepares breakfast for herself on a weekday morning is to be the anti-Bridget Jones, the sort of person who has an organized sock drawer and an empty inbox. There's meditative serenity in kitchen puttering that I can rarely manage to leave time for on a Tuesday morning. When I actually do carry it off, I have the distinct (slightly smug) sense that I have ascended to a higher plane of being.

For Christmas, I received a subscription to Martha Stewart's pint-sized magazine Good Food. Martha, of course, dwells perennially in the aforementioned higher plane of being. To date, I'd mostly used the magazine for breakfast reading, not actual breakfast recipes. But the first recipe in this month's issue was this grapefruit concoction, which was easy and insanely delicious. It turns out that attaining a higher plane of being isn't as hard as it looks.

***
Roasted Grapefruit with Yogurt
adapted from Martha Stewart's Good Food magazine

When you stumble downstairs half awake, turn on your broiler. Do not--I repeat, do not--forget that you turned it on and fall back asleep on the couch. Cut in half:
1 red grapefruit

Sprinkle each half with:
1 Tablespoon brown sugar (more if you suspect the grapefruit of being unsweet)

Stick the sugar-dusted grapefruit under the broiler for 4-5 minutes, or until you are too impatient to wait any longer. Remove and top each half with:
Large spoonful plain yogurt
pinch cinnamon

Martha suggests that you cut the grapefruit before broiling to make it easier to separate fruit from pith and peel. If you can manage this kind of knife work before breakfast, fine. For me, there are limits even to my ascension.

Wednesday, March 21, 2007

Beets and Cheese

The second in a series of odd eating when the Human Vacuum is out of town.

I consoled myself over the H.V.'s departure by buying about $30 worth of fancy cheese. One of the sillier purchases was a tiny glass jar of something called Miticrema, which I now know is a soft cream cheese-like sheep's milk cheese with a yogurty tang. I didn't know what it was when I bought it, of course. I'm just a sucker for tiny glass jars of expensive foodstuffs (see fig spread, caviar, french full fat yogurt, saffron, et al.)

Elsewhere in the grocery cart, a significantly less expensive pair of beets. I've never really loved beets. In salad bars, I find them quite alarming, lying there in coins that bleed magenta into the bin of chickpeas next door. But the recent craze for salads of layered roasted beet and goat cheese and walnuts/whatever in snooty restaurants has convinced me that I have been giving beets short shift. Having never bought a beet in my life, now was the time to face the beast, err, beet on my own turf. This dish always has a fancy description on restaurant menus, like "roasted beet napoleon" or something silly. You know what it really is? Beets and cheese, thank you very much.

And what better way to face the unfamiliar than with cheese?

***
Beets and Cheese

Turn the oven on to 450 degrees.

Wrap in foil:
1 beet, peeled
Put it in the oven (no need to wait for it to preheat). After an hour or so, unwrap the beet and stick a knife in to make sure it's soft and tender. If not, rewrap and give it another 10 minutes or so.

Slice the beet into rounds and rub on a little:
Balsamic vinegar (I used a nifty fig balsamic which was a gift from my oldest ToastFriend, which added even more rich sweetness to the beet)

Then build a tower of alternating layers of beet and:
Spoonfuls of miticrema, goat cheese, or other creamy, strongly-flavored cheese

Eat standing up in the kitchen with a side of leftover chickpeas from a pan in the fridge. Or as a fancy hors d'oeuvre. Whatever.

(Note: I could only make myself eat about half of a beet in this manner--the cheese is quite rich.)

Monday, March 19, 2007

Gnawing on Bones, Alone


Tonight at 8:45 p.m., I found myself savagely digging the marrow out of my third and final roasted beef bone with a grapefruit spoon. All because the Human Vacuum is out of town. Oh, how the mighty have fallen.

I thought the absence of the H.V. would be a good opportunity to load up the sort of food he tends to shun. Thus my impulse buy of three fat beef bones at the grocery store last night. I had the vague idea that people in British novels did something with marrow, and that it was considered a treat by small children. Fueled by that single blurry thought, I tossed them in my mini-cart at Whole Foods. Tonight, after fiddling around waiting for the Falcon 1 launch (aborted, again. sigh.), I cranked up the oven and tossed them in.

In the sprirt of the novels that inspired this dinner, I must tell you, Dear Reader, that the resulting dinner was scrumptious. Crunchy lemony salad, rich unctuous marrow, warm buttery toast. It was just what I dreamed it would be, and it was precisely the sort of thing best eaten alone, away from prying eyes--even of those who love us most. While eating, I descended into savagery, rasping my spoon around the inside of the bones to retrieve the last tasty morsels.

Hey, at least I was still using utensils, right?

***
Roasted Marrow on Toast
(Despite the rarity and seeming fancy-pantsness of this meal, it was quite easy to make. Rachel Ray could do a 30 Minute Meal of marrow bones and still have time left over to make a box cake. And it's a one-pan meal, so clean up is quick, too.)

Preheat the oven to 450 degrees.

Place on a foil-lined pan:
3 beef or veal bones, cut into 3 inch pieces

Arrange the bones cut sides down so that they stand like a tiny, meaty Stonehenge in the pan. Stick them in the oven for about 20 minutes. They'll be done when they bleed a little fat and the marrow is soft all the way through, which you can check by poking them with a skewer or thin knife.

While the bones are a-roastin', make a tiny salad. All the recipes I found online call for a parsely salad, which I'm sure would be lovely. But when you've impulse-bought beef bones, it's unlikely that you've also coincidentally impulse-bought two handfuls of parsely. So, I just used:
1 handful salad greens, torn small

Dress with the following, whisked together:
1/2 lemon, juiced
2 Tablespoons olive oil
1 clove garlic, minced or microplaned (I used a squeeze of the preprocessed stuff--no one was looking, so I figured I could get away with lazy man's garlic)
Salt and pepper

Then toast:
2 pieces plain white bread

Yank the bones out of the oven, arrange everything on a plate and serve with a small spoon for savage digging. To eat: scrape out the marrow, smoosh it onto triangle of toast, and (this step is very important) sprinkle with salt. Alternate with bites of salad.

Monday, March 05, 2007

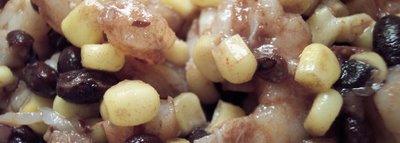
Shrimp, Black Bean, and Corn Salsa


What follows is what is quaintly called a "pantry supper" in certain old-fashioned cookbooks. The genteel emphemism conceals this less-than-ladylike sentiment: "&%$#ing hell. There are zero fresh vegetables or meat in this house, but there is no way on God's green earth that I am going to the grocery store in this weather/this time of day/in this mood/in this shirt." This meal can be made entirely from the freezer and cupboards. The ingredients are, of course, suggestions. If you have pinto beans or chickpeas but no black beans, go for it. If you're fresh out of frozen corn, throw in peas or edamame, or whatever. The point is reduce stress, not create more.

***
Shrimp, Black Bean, and Corn Salsa

Combine in a large bowl:
1 can black beans, drained
2 cups frozen corn, thawed in the microwave.
1 pound shrimp, cooked and roughly chopped
1 teaspoon cumin
1/4 teaspoon cayenne pepper
Salt and pepper
Splash of soy sauce

Eat directly out of the bowl with tortilla chips, enjoying the hypnotic, soothing crunch that they create inside your head. If you're very lucky, and your freezer happened to have some Costco guacamole in it, eat it in alternate bites.

Saturday, March 03, 2007

Words of Wisdom

"I think bacon is essentially the meat lover's version of chocolate. It does the same thing to people."

Too true.


Read more about bacon's "new sizzle" in the Pueblo Chieftain.

Or learn how to make your own chocolate-covered bacon here.

Or admire Sir Francis Bacon, at right.

Your call.

Friday, March 02, 2007

Cook's Illustrated Brownies


There's something about brownies. They don't carry the Holly Homemaker baggage of cookies (cf. Hillary Clinton: "You know, I suppose I could have stayed home and baked cookies and had teas, but what I decided to do was fulfill my profession."), but they're not fussy either (cf. pastillage).

Inspired by Smitten Kitchen, I decided to experiment with a batch of Cook's Illustrated brownies. As is often the case, I was seized by the urge to bake at an inconvenient time. These things always take longer than you think, so it was 10:30 p.m. before the brownies were anywhere near the cutting stage. After tasting one and declaring it a success, the Human Vacuum got on the phone and called everyone we know in the apartment building. (This was an act of self-defense. An entire pan of brownies in the house only leads to the consumption of an entire pan of brownies unless steps are taken.) Next thing you know, we were hosting a mini brownie party. One visitor arrived sporting pajama pants paired with gold ballet flats. The lesson: Bake it, and they will come.

(A note: Cook's Illustrated is an outstanding magazine. So outstanding, in fact, that when the Human Vacuum and I moved to Boston, I considered applying for a job in their famed America's Test Kitchens. They make 100 pans of brownies to figure out the absolute best technique and ingredients. But before I made much progress on figuring out how to falsify my resume to make it seem like I had two years of restaurant experience, I was struck down by a bout of common sense.)

(Another note: There has been some recent controversy over brownies. From the latest in the "young women are in trouble" genre, Unhooked, by Laura Sessions Stepp: “Tying one on can be fun occasionally. Just don’t let it take over your social life. Organize weekend getaways and other events to bring people together. Bake cookies, brownies, muffins. Ask your girlfriends for assistance. Guys will do anything for homemade baked goods.”)

For more hot brownie action, check out Once Upon a Tart's browniebabe of the month event.

***
Classic Brownies

The recipe is quite involved, as Cook's recipes tend to be, and you can't improve on the directions offered by America's Test Kitchens, so I'm cutting and pasting from my source, Smitten Kitchen. It seems like a lot of work, but the perfect, crackly top and moist dense inside are worth it.

Be sure to test for doneness before removing the brownies from the oven. If underbaked (the toothpick has batter clinging to it) the texture of the brownies will be dense and gummy. If overbaked (the toothpick comes out completely clean), the brownies will be dry and cakey.

1 cup (4 ounces) pecans or walnuts, chopped medium (optional)
1¼ cups (5 ounces) cake flour
½ teaspoon salt
¾ teaspoon baking powder
6 ounces unsweetened chocolate, chopped fine
12 tablespoons (1½ sticks) unsalted butter, cut into six 1-inch pieces
2¼ cups (15¾ ounces) sugar
4 large eggs
1 tablespoon vanilla extract

1. Adjust oven rack to middle position; heat oven to 325 degrees. Cut 18-inch length foil and fold lengthwise to 8-inch width. Fit foil into length of 13 by 9-inch baking dish, pushing it into corners and up sides of pan; allow excess to overhand pan edges. Cut 14-inch length foil and, if using extra-wide foil, fold lengthwise to 12-inch width; fit into width of baking pan in same manner, perpendicular to first sheet. Spray foil-lined pan with nonstick cooking spray.

2. If using nuts, spread nuts evenly on rimmed baking sheet and toast in oven until fragrant, 5 to 8 minutes. Set aside to cool.

3. Whisk to combine flour, salt, and baking powder in medium bowl; set aside.

4. Melt chocolate and butter in large heatproof bowl set over saucepan of almost-simmering water, stirring occasionally, until smooth. (Alternatively, in microwave, heat butter and chocolate in large microwave-safe bowl on high for 45 seconds, then stir and heat for 30 seconds more. Stir again, and, if necessary, repeat in 15-second increments; do not let chocolate burn.) When chocolate mixture is completely smooth, remove bowl from saucepan and gradually whisk in sugar. Add eggs on at a time, whisking after each addition until thoroughly combined. Whisk in vanilla. Add flour mixture in three additions, folding with rubber spatula until batter is completely smooth and homogeneous.

5. Transfer batter to prepared pan; using spatula, spread batter into corners of pan and smooth surface. Sprinkle toasted nuts (if using) evenly over batter and bake until toothpick or wooden skewer inserted into center of brownies comes out with few moist crumbs attached, 30 to 35 minutes. Cool on wire rack to room temperature, about 2 hours, then remove brownies from pan by lifting foil overhang. Cut brownies into 2-inch squares and serve. (Store leftovers in airtight container at room temperature, for up to 3 days.)